


Image personalization is a powerful tactic that enhances email marketing campaigns. At its core are dynamic visual elements to match each recipient’s unique preferences, behaviors, or data.
This approach transforms a standard email into an engaging, contextually relevant experience to form a connection between your brand and email subscribers.
What Is Image Personalization for Email Campaigns?
Personalized images in emails combine dynamic content with customer lifecycle segmentation to create visual assets that speak directly to the user.
For example, a SaaS company might use a recipient’s name, location, or recent activity to customize an email banner or header of a cold email. This not only adds a personal touch but also makes the email feel more engaging and relevant.
Ways to Personalize Email Content
- Welcome Emails: Add the recipient’s name or their trial start date to a customized email header.
- Product Recommendations: Include a dynamic image of items the user recently viewed or products similar to their past purchases.
- Milestone Celebrations: Feature a personalized banner congratulating a user on completing a tutorial or reaching a milestone in their free trial.
- Localized Offers: Use an image that reflects the recipient’s city or country, creating a connection with their location.
By incorporating personalized images for email campaigns, you can elevate the recipient’s experience, strengthen brand loyalty, and drive more conversions. This tactic transforms a simple email into a powerful tool for meaningful engagement.
Why Send Email Campaigns with Personalized Images?
There are many reasons to send personalized welcome emails when a new user signs up for a free trial of your SaaS product or a new user subscribes to your newsletter. Beyond the basics, personalized email marketing can amplify the effectiveness of your welcome emails. Let’s explore how targeted email campaigns can increase free trial conversions.
Best Practices of Image Personalization in Email Marketing
Image personalization relies on:
- Data Integration: Pull user data such as name, location, preferences, or actions.
- Dynamic Content: Generate customized visuals by embedding personalized details into the design, such as product recommendations or location-based greetings.
- Real-Time Rendering: Use tools like DynaPictures to create images that update dynamically based on user data when the email is opened.
We have more tips on email personalization that we covered in another blog.
The benefits of email personalization
- Increase Engagement
Guide users to the next step with clear instructions and visually appealing, personalized email headers or banners that simplify engagement. - Improve Open Rates
Personalized subject lines stand out in inboxes, increasing open rates by addressing recipients by name or referencing their interests. - Reduce Support Requests
Address common questions and provide easy access to support resources. Adding personal touches, like using the recipient’s name, makes communication more engaging. - Build Relationships
Share your brand story through personalized headers that reflect users’ needs, creating a strong first impression and fostering connection.
But these are the basics that you probably already do. If you don’t here are some marketing personalization stats that are quite convincing.
How else can you use this contact opportunity to strengthen relationships? How to make this touchpoint with the brand memorable?
Why do Email Marketers Use DynaPictures to Create Personalized Images for Email Campaigns?
With DynaPictures, you can create a personalized memorable experience for your brand by generating a personalized greeting card or a custom PDF, such as a whitepaper.
This helps not only tell your story visually but also customize emails in batches for memorable personalized onboarding. for the users in a way she doesn’t expect to. Exceeding expectations is the result we all strive for. Users will be more likely to memorize your brand and find time to test your product during a free trial period. This works especially well when they evaluate and test multiple products simultaneously.
Here is the card that we send when a user signs up for a free trial at DynaPictures:
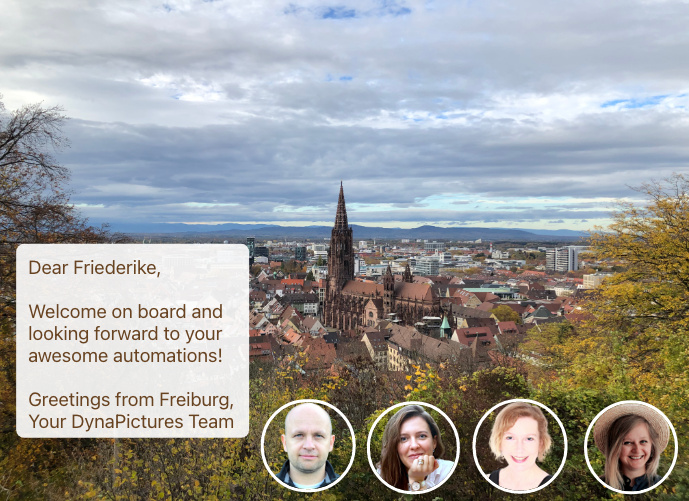
This banner card includes:
- Name of the recipient.
- Our location in the email signature
- Photo of our location. We plan to dynamically rotate our location photos depending on the season, holidays, etc. You can also change images in email banners dynamically depending on the country where the client is served, or even show a photo of the country the client comes from.
- Team members – you can change this dynamically, depending on who is doing support at the moment or feature best performing employees.
Here are some additional ideas that could be implemented here:
- Make it look more like a postcard by adding an envelope image on the background, a stamp, etc.
- Include the date and time when the image was produced
- Include a photo of the client in the recipient area
- include a personal signature of the CEO
We will show you how to build a similar personalized email banner. We will use URL Parameters so that the image is generated when a client opens an email. You could also generate an image in advance and send it as an attachment using No-Code or REST API.
Create a Personalized Image for Marketing Email in Editor
Let us create our image template for email first and then use it in our automation. Go to Image Templates and then click on the “+ New Image Template” button:
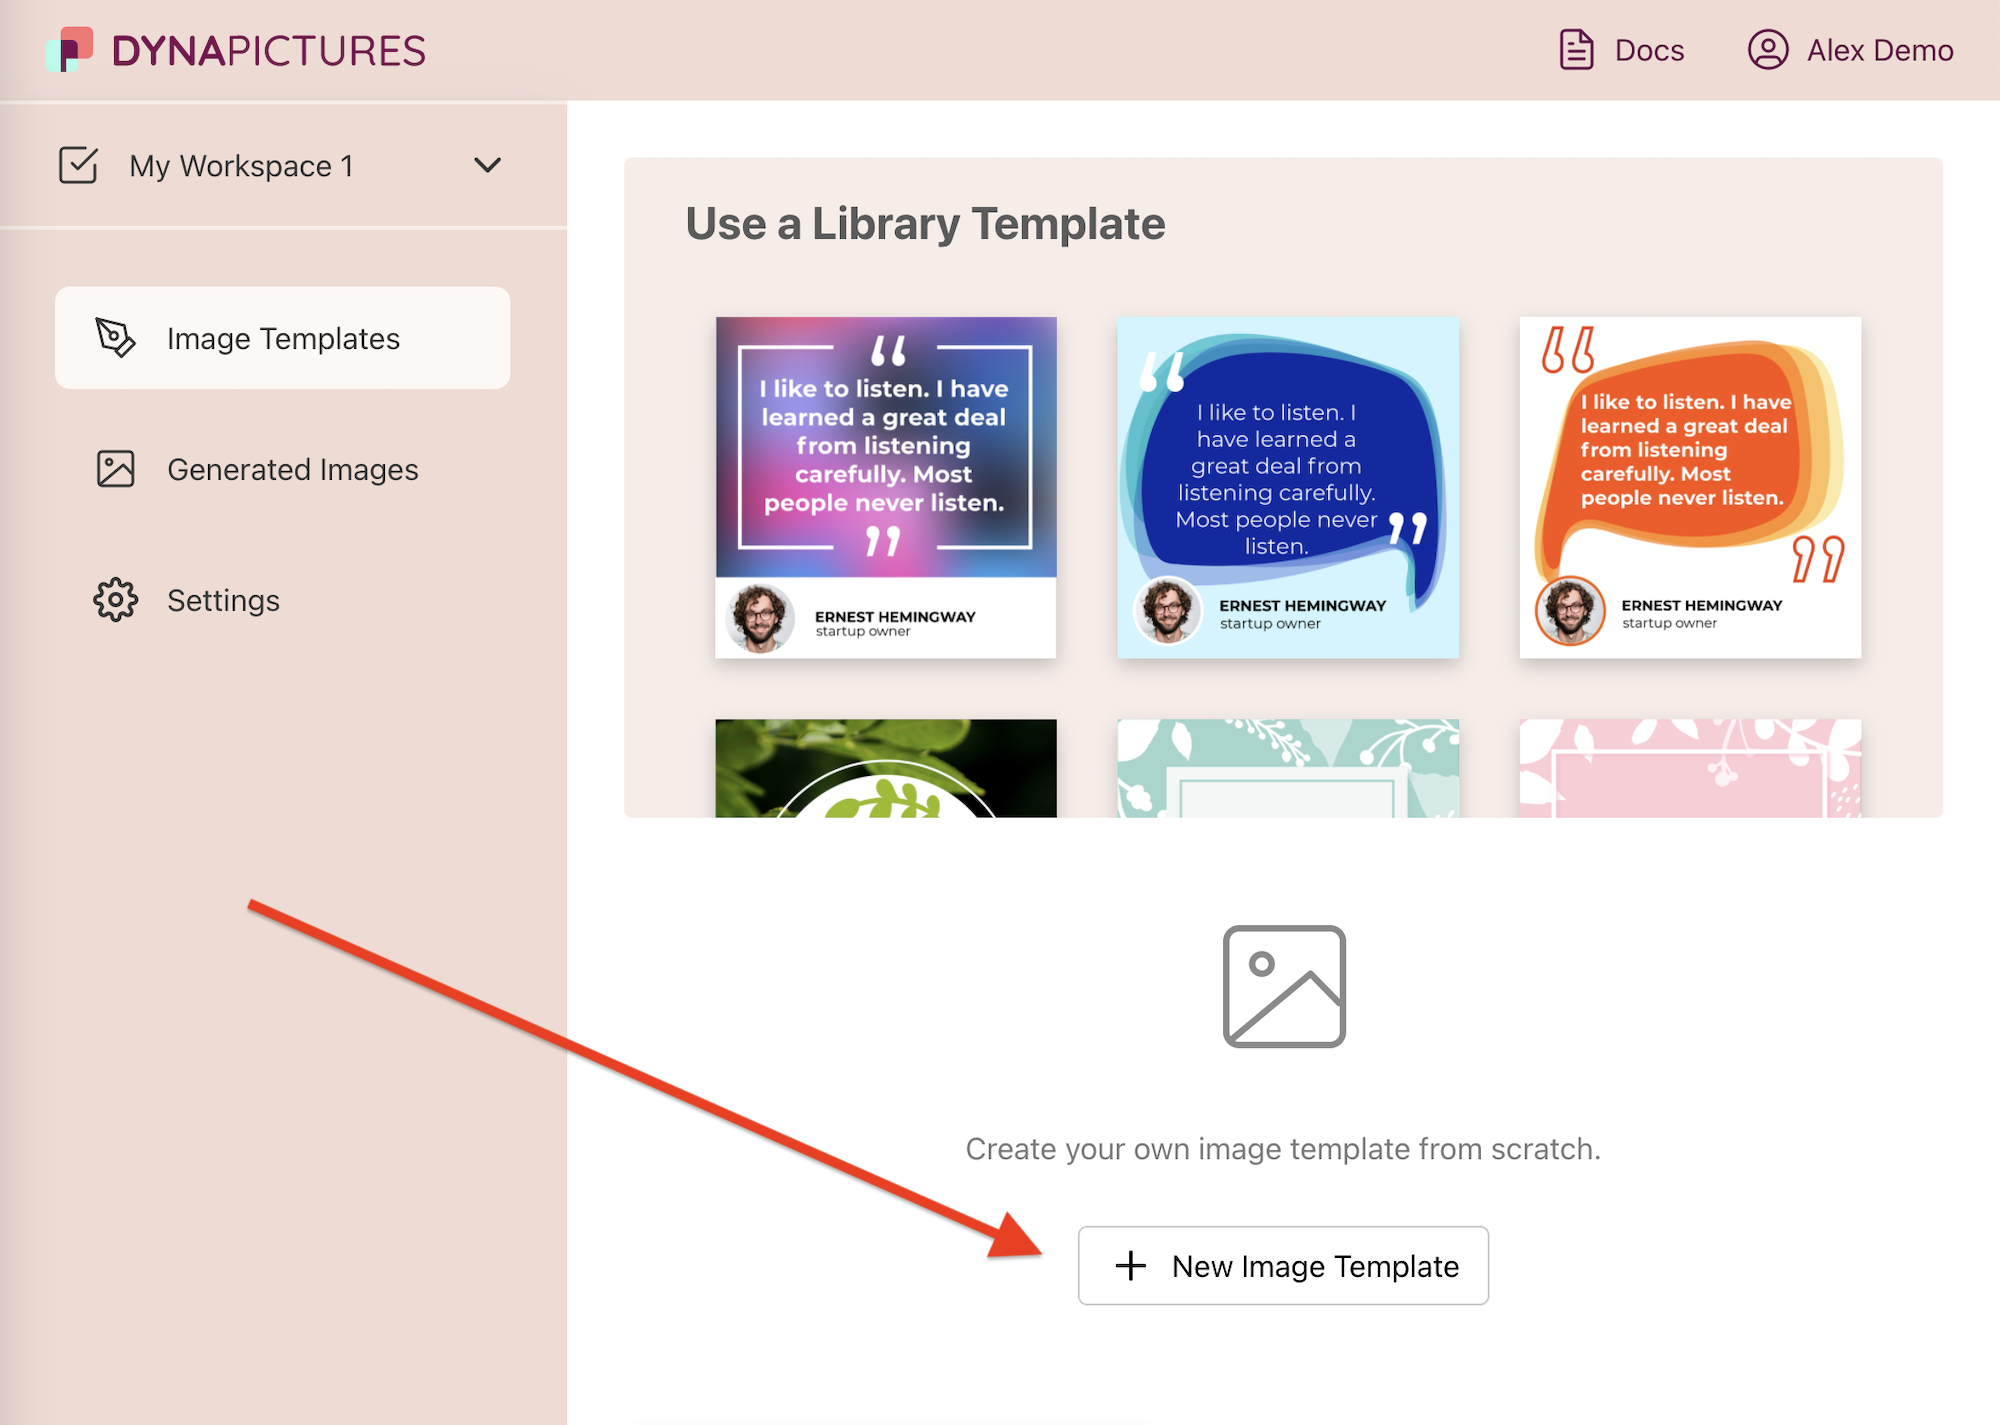
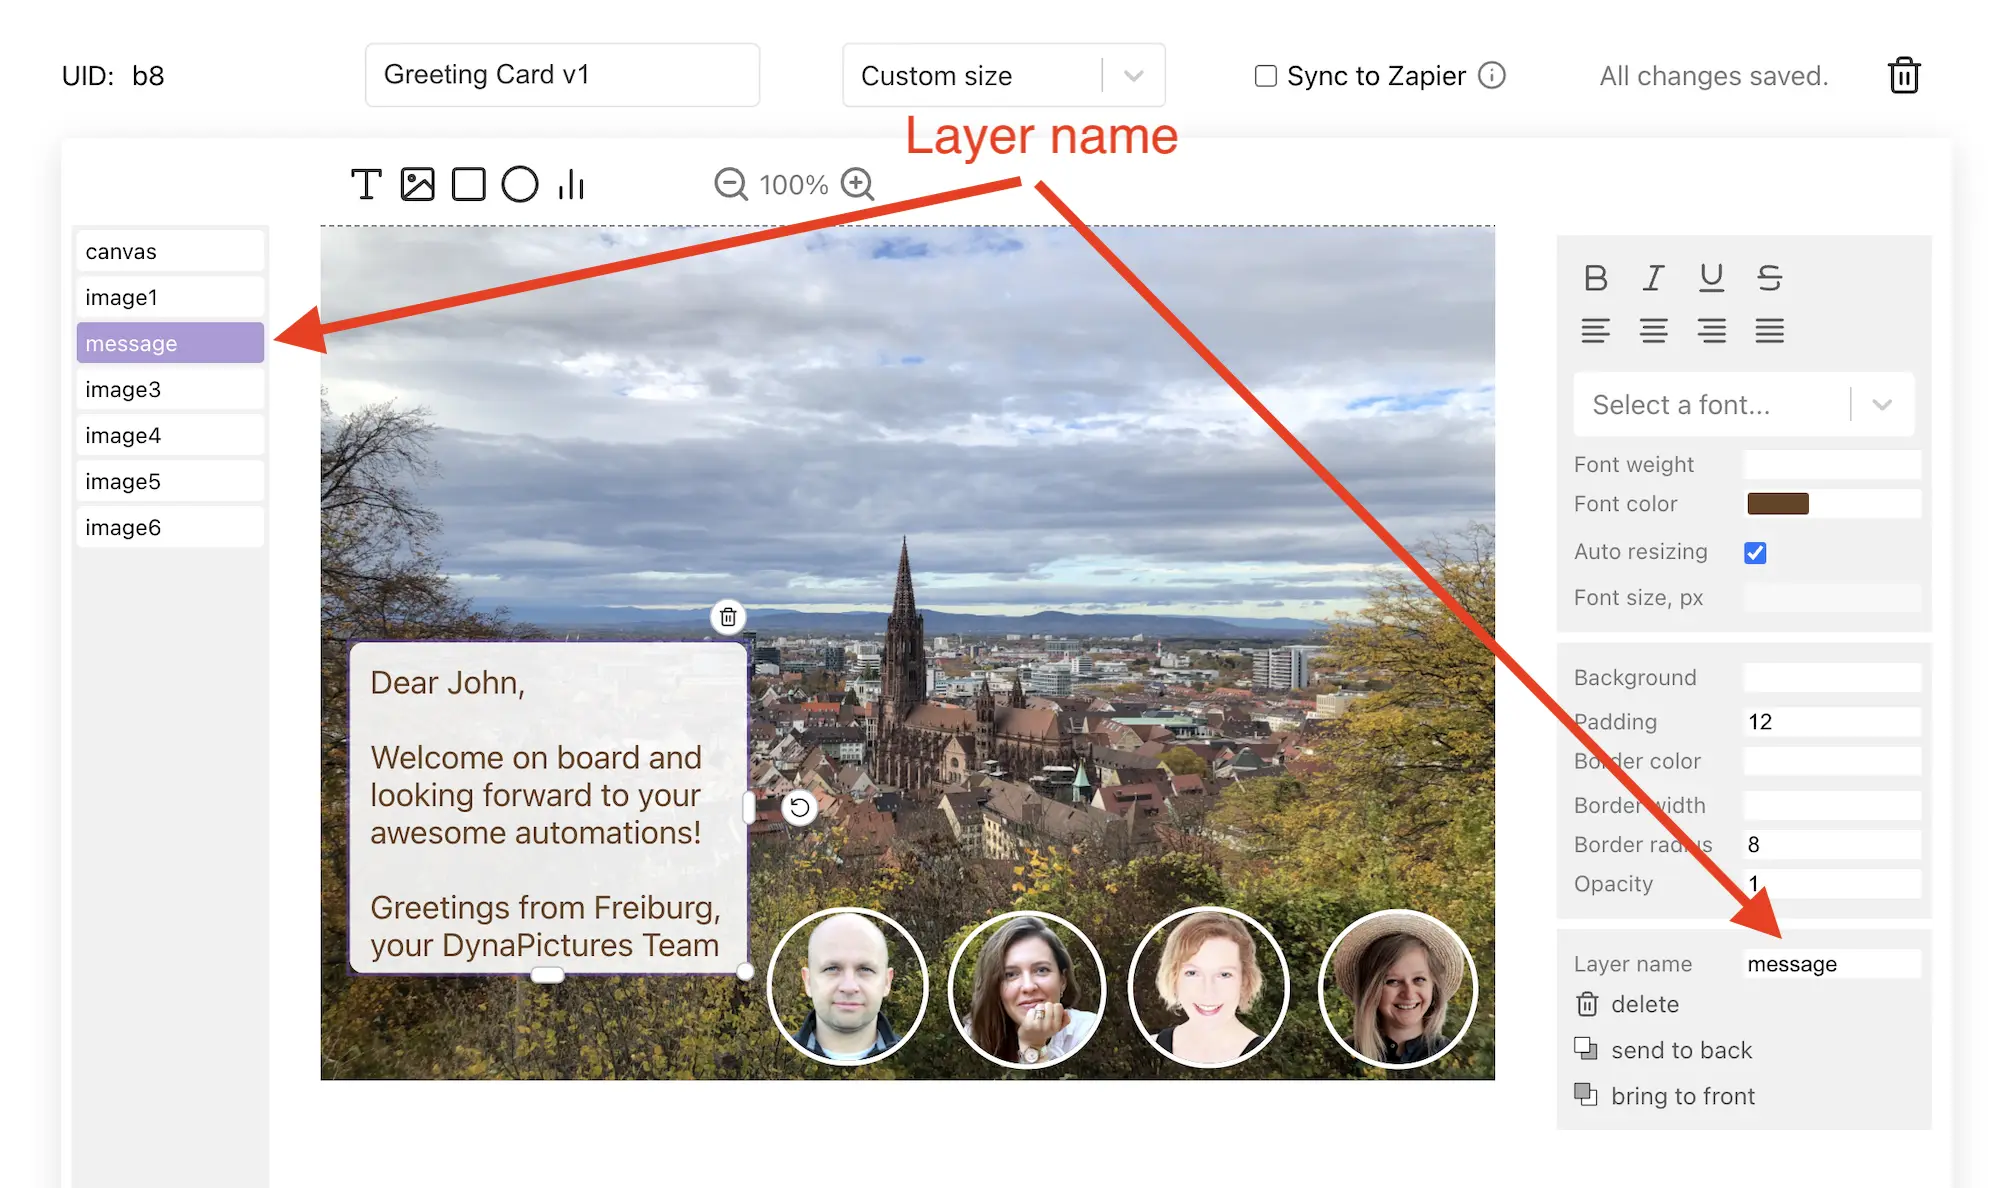
If you are new to our concept of layers and template editing, learn how to generate banners from our Twitter tutorial. Now we need to add the following layers to the image:
- image1 – An Image shape that covers the whole canvas and will hold our background. You can upload your own banner or use a pre-set from our template library.
- message – A text shape that contains the text of the greeting card. You can put any placeholder text there for now.
- image3 – An image shape, containing the avatar of the first team member.
- image4 – An image shape, containing the avatar of the second team member.
- and so on…
Here is what we designed in our banner image template for onboarding emails at the end:
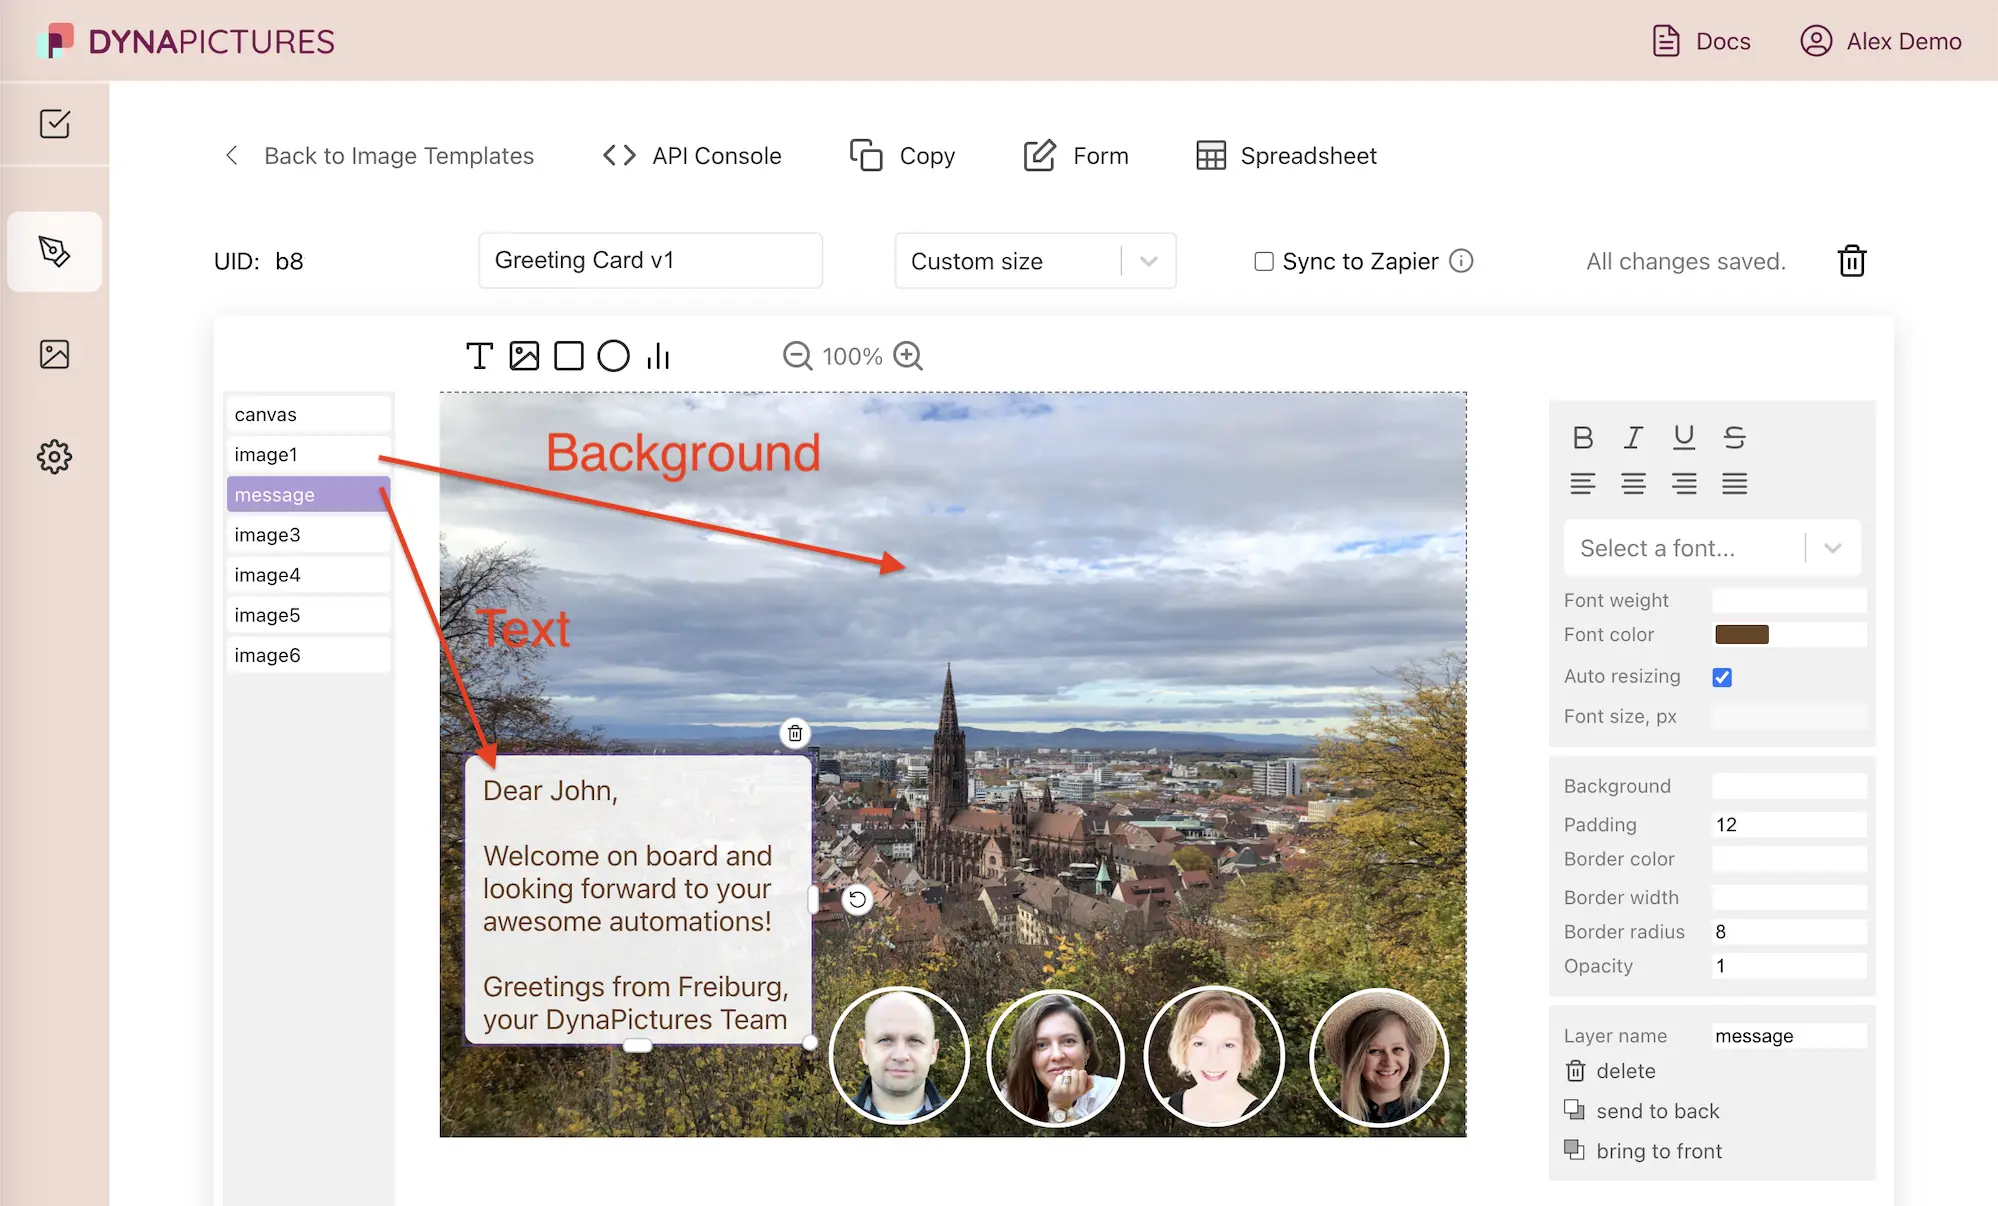
Note the layer names listed on the left, so that we can refer to them in the next step when we generate personalized email images.
Once our template is ready, we can start embedding it into our emails and generate personalized images that are based on it.
Generate Personalized Images for Email via URL
A personalized email image can be generated using URL parameters, if we compose the image URL so that it contains the template ID and the new values for the layers that we want to customize.
This new personalized onboarding image will be generated when the email is opened and the image is shown for the first time.
The dynamic image URL is built using the following schema:
https://api.dynapictures.com/links/{TEMPLATE_ID}.png?params={PARAMS}You need to replace the {TEMPLATE_ID} and {PARAMS} placeholders with your own values.
You can also use No-Code tools or REST API if you don’t want to use URL parameters.
Now let’s go over each URL parameter in detail.
TEMPLATE_ID
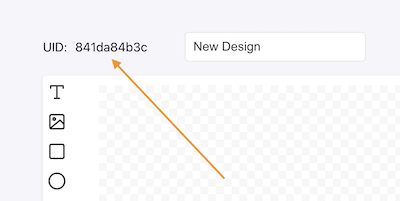
The template ID is a unique identifier of your image template. You can find it in the upper left corner of the template editor:
PARAMS
The parameter list with custom values for the layers in the image template. The list elements are separated by <> string (two symbols, the < and the >). The individual elements of the string a represented as a trinity of layer name, parameter name, and parameter value. So we can specify the layer we want to customize the parameters for, for instance, an image, and then parameter of this layer, for instance, an imageUrl and then finally we provide the value of the image URL as a last piece. This trinity is written in the following way:
{LAYER_NAME}---{PARAMETER_NAME}___{PARAMETER_VALUE}The layer name can be found in the list of layers on the left or in the settings panel of a layer when it’s selected:
For example, if we want to show another image on the background, we need to spec fify the following parameter for the image layer with the image1 name:
image1---imageUrl___https://dynapictures.com/images/banners/cat1.jpegAnd if we need to personalize the text content of the text layer with the message name:
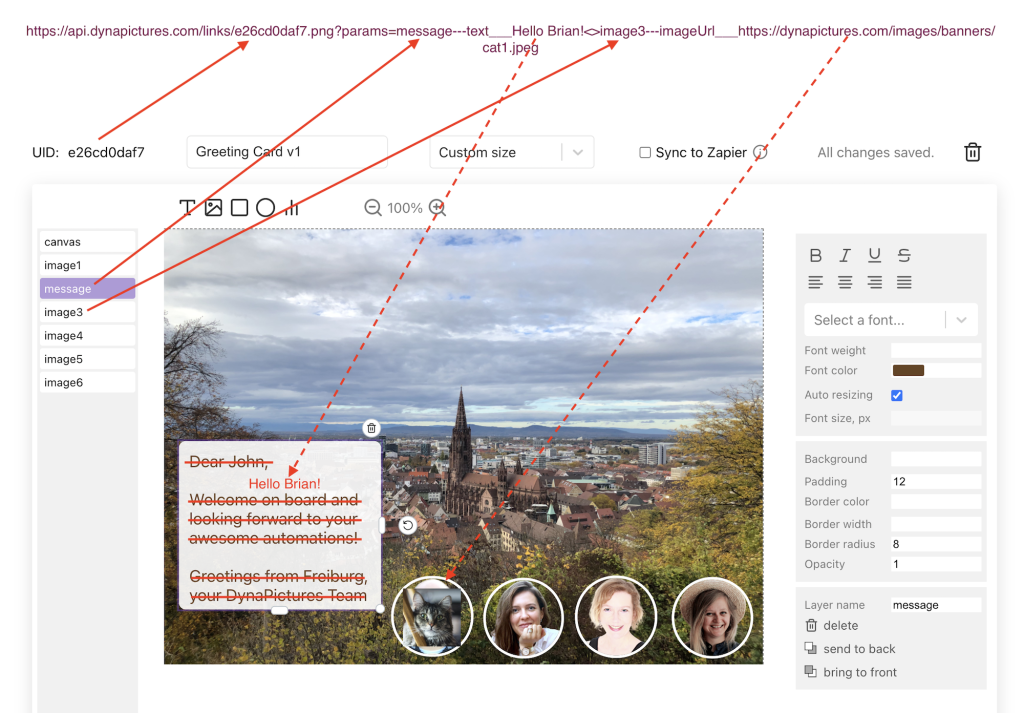
message---text___Hello Brian!Finally, here is how the final URL will look like if we want to customize the text of the message layer and use another image for a team member in our greeting card template with UID e26cd0daf7:
https://api.dynapictures.com/links/e26cd0daf7.png?params=message---text___Hello Brian!<>image3---imageUrl___http://dynapictures.com/images/banners/cat1.jpegHere is a visual mapping and explanation of how the personalized email image link is built. The solid lines represent the info that we need to take from the image template, and the dashed lines show how our custom information can be shown in the layers we specify:
Finally, insert this dynamic image link into your welcome email template.
Pass the link directly as a parameter to your email template if you use No-Code tools, or just use the HTML code below in case you can adjust your email templates manually:
<img alt="Your personal. greeting card - allow images in your email client to see it" src="https://api.dynapictures.com/links/e26cd0daf7.png?params=message---text___Hello Brian!<>image3---imageUrl___http://dynapictures.com/images/banners/cat1.jpeg" />Incorporating personalized elements into your welcome emails—such as targeted email campaigns, personalized email headers, and customized banners—can significantly enhance user engagement, strengthen customer relationships, and drive conversions. By leveraging these strategies, you’ll create a more impactful experience for your SaaS users, helping them move from trial to loyal subscribers.
FAQ
To create a banner for email use image generation tools like DynaPictures. You can personalize your email banners in bulk by following these steps:
1. Start by designing a custom email banner template using an editor that allows for layered design.
2. Add layers such as background images, text, and placeholders for dynamic elements (e.g., user names or custom images).
3. Use URL parameters or APIs to dynamically personalize the banner content based on user data.
4. Embed the banner image link in your email template using HTML or a no-code automation tool.
Yes, personalized emails outperform generic ones. The difference is as follows.
• Personalized emails have higher open rates, especially when subject lines are customized.
• They boost engagement with customized banners, content that resonates with recipients.
• Increase conversion rates as users feel more connected to the brand. By using tools to create personalized email headers and banners, you can further improve your email campaigns.
The benefits of custom emails include:
• Higher Conversion Rates: Personalization creates trust, increasing the likelihood of users taking desired actions, such as subscribing or purchasing.
• Enhanced User Engagement: Recipients are more likely to open, read, and act on personalized messages.
• Stronger Customer Relationships: Tailored content makes users feel valued, fostering loyalty.
To write personalized emails effectively:
1. Address the recipient by name or use other personal details (e.g., location, preferences).
2. Use a friendly and conversational tone to make the email feel relatable.
3. Highlight specific actions the user has taken (e.g., signing up for a free trial) to create relevance
4. Add visual elements like personalized email headers or banners to make your message stand out.
5. Incorporate a clear call-to-action that aligns with the user’s needs or journey.
Personalizing the onboarding experience can leave a lasting impression. Here’s how:
• Dynamic Welcome Emails: Use personalized email headers to greet users by name and highlight the next steps.
• Custom Onboarding Banners: Generate personalized email banners that reflect user-specific details, such as location or preferences.
• Tailored Tutorials: Provide guides or resources relevant to the user’s goals, based on data collected during signup.
• Milestone Celebrations: Send emails to celebrate small wins, like completing a tutorial or reaching a usage milestone.
• Responsive Support: Personalize support interactions by addressing users’ specific queries or challenges.
By implementing these strategies, you can make onboarding more engaging and memorable, increasing the likelihood of converting free trial users into loyal customers.
Personalizing cold emails can increase their effectiveness by capturing the recipient’s attention and establishing relevance. Here are some actionable tips to personalize your cold emails:
• Look up the recipient’s role, company, and recent accomplishments on platforms like LinkedIn or their company website.
• Tailor your message and image in an email to align with their professional interests or industry-specific challenges.
• Use a personalized subject line.
• Reference a mutual connection, a shared interest, or something relevant to their work.
• Leverage dynamic content with tools like DynaPictures for a personalized experience.
• Use data-driven personalization.
